Instructions for Scout-N-Hunt Mobile Hunting Maps
To use the mobile map you must first download the CarryMap app to your device. Go to Get Started & Install if you have not loaded it.
To use the mobile map you must first download the CarryMap app to your device. Go to Get Started & Install if you have not loaded it.
Functions of the eight (8) map screen buttons: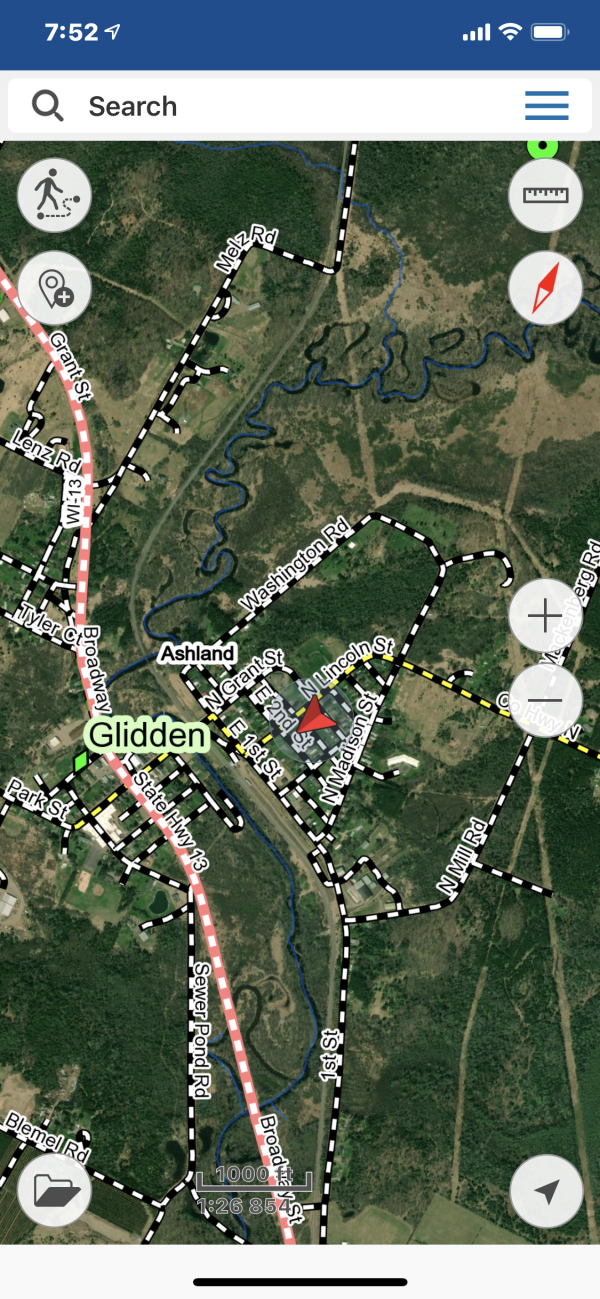
How to customize your map’s icons:
Once your map is installed and you have entered the map password to open the map, in the upper right hand corner of the screen are three bars (also known as a hamburger menu). Tap on the menu and a new screen opens from right to left. One of the menu items reads Settings. Tap on Settings and you can customize your maps as noted. Under ICONS, tap on current symbol to the right of Pushpin and you can choose what will display on your map when marking a location. You can also change the My location symbol that marks your current location on the map following the same procedure.
How to add a basemap:
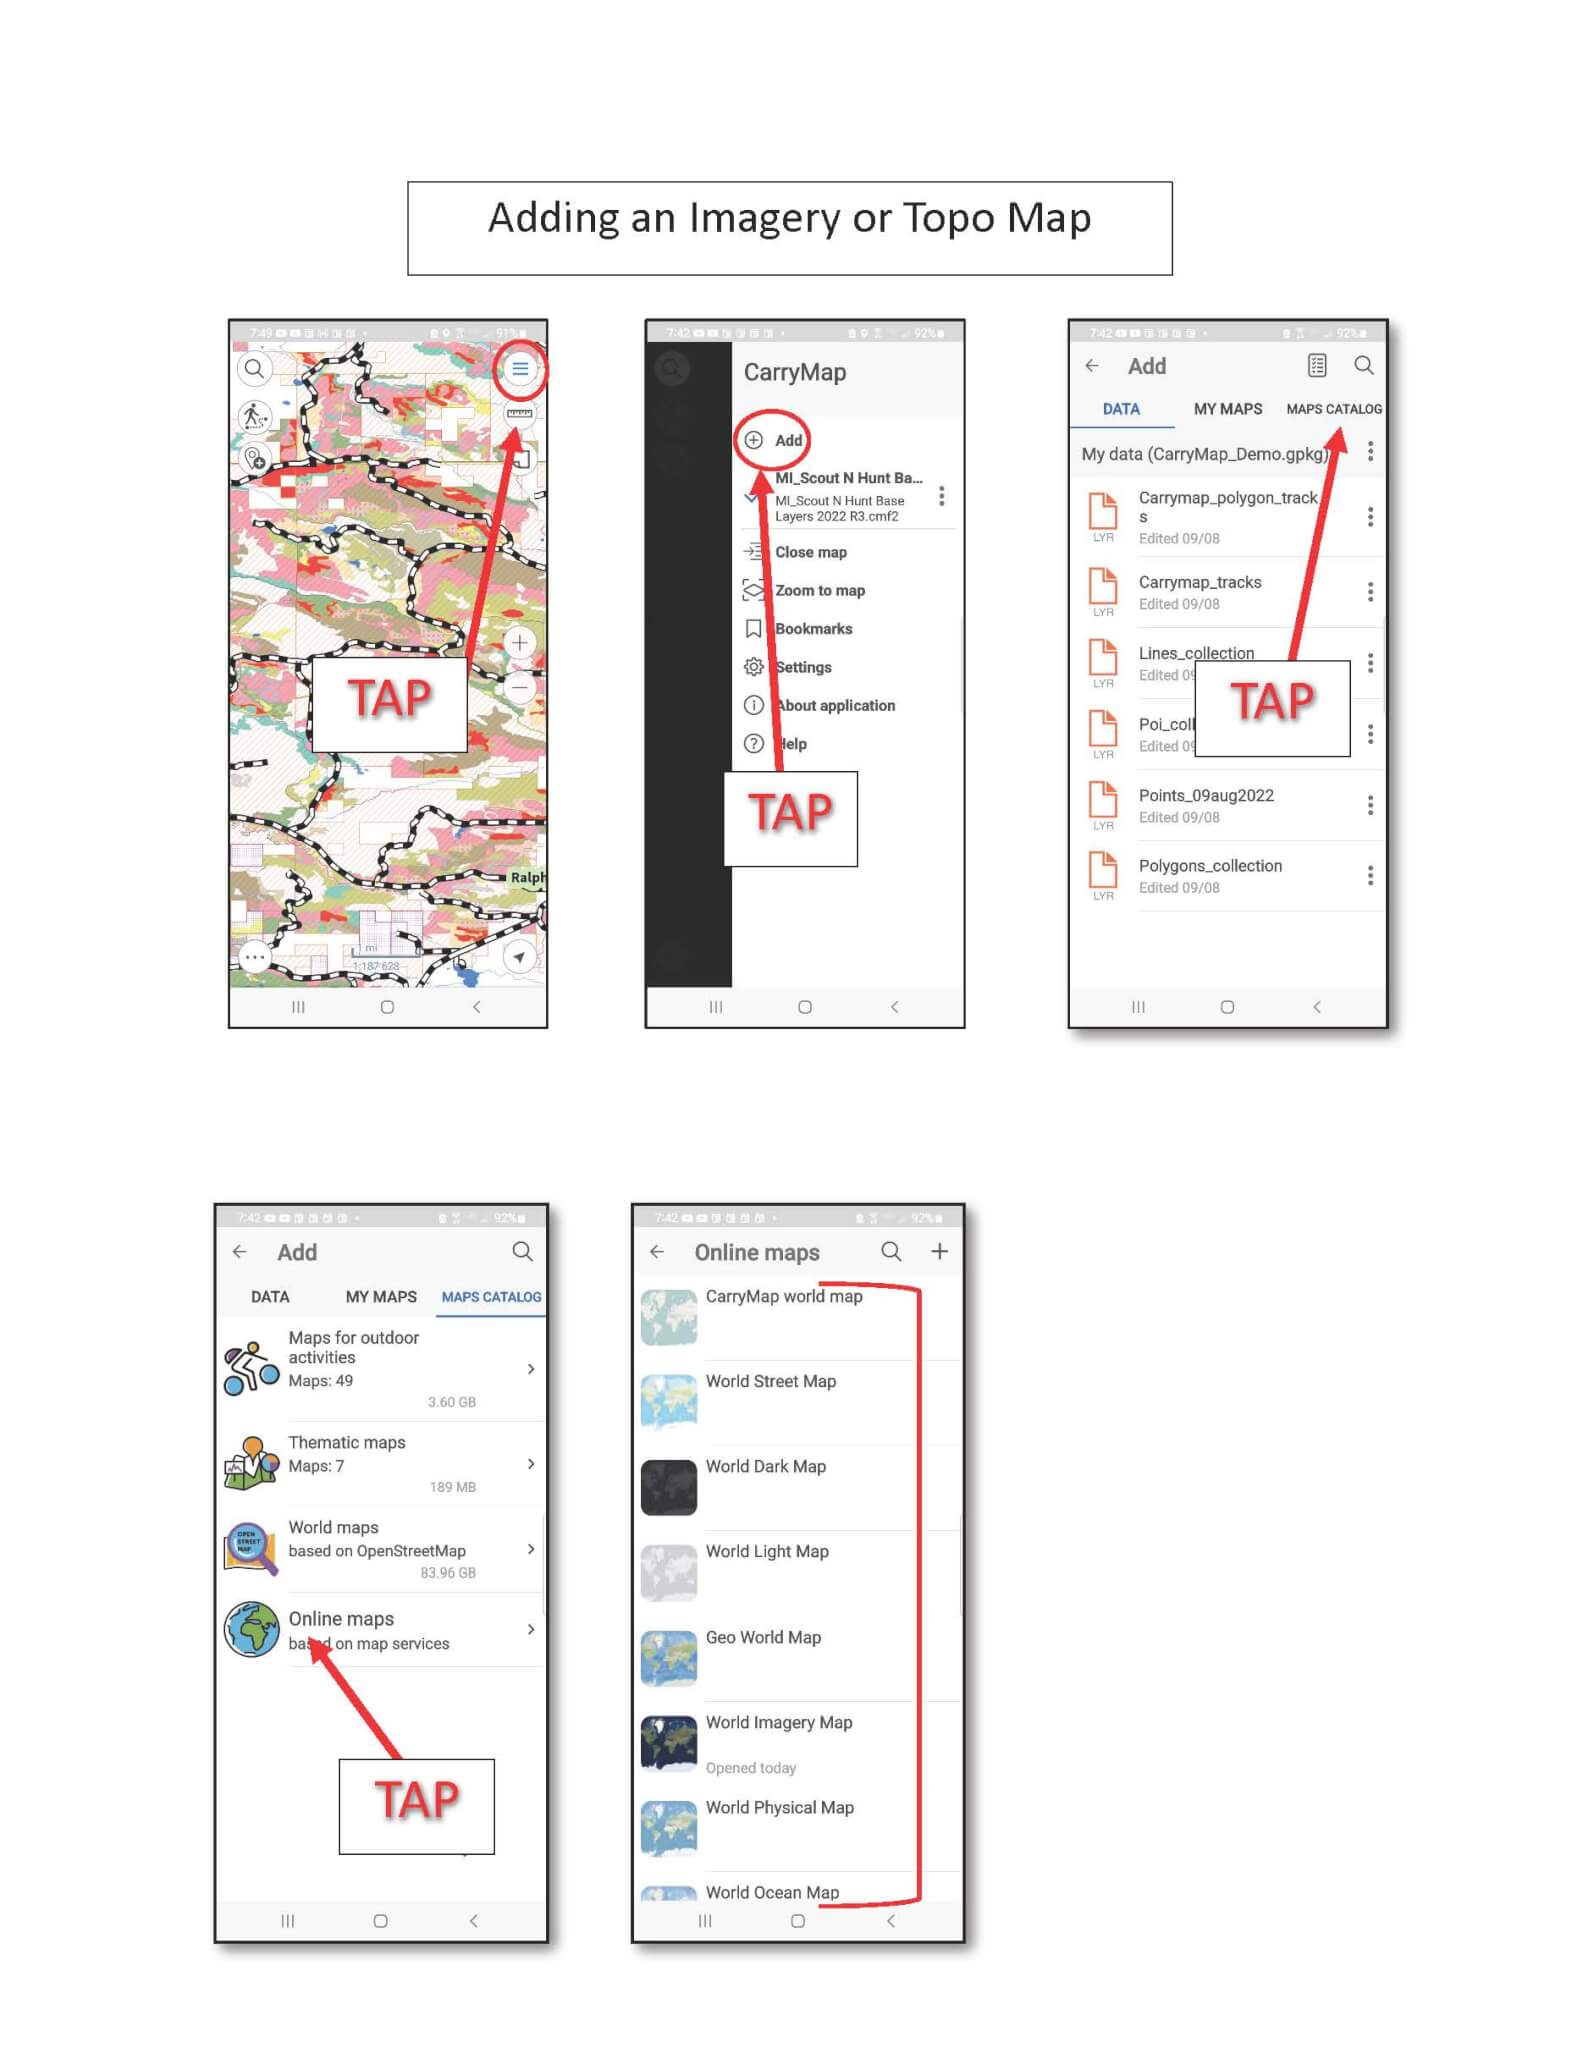
How to select a basemap:
1. Start with your map displayed on the CarryMap screen
2. Tap on the menu (three parallel bars in the upper right corner of the screen)
3. If you don’t see the name of your map with a blue check mark next to it, tap on + Add , then tap on Maps at the bottom of the screen.
4. Tap on the name of the map you want to open. A closed padlock means you will need the password
5. After the map opens, tap on the menu in the upper right corner of the screen
6. Tap on Add basemap and select from the 9 different basemaps (most commonly used are World Topographic Map or World Imagery)
7. A pop-up will appear regarding the coordinate system…tap on OK
8. The screen now shows the map file and the name of the basemap with blue check marks to the left
9 Tap on the left side of the screen which displays a portion of the map and the screen will scroll to the right, with the screen displaying the entire map
10. To change to a different base map, tap on the menu, on the name of the basemap, not the check mark, and choose a different basemap
11. You can turn the chosen basemap layer off by tapping on the check mark and you can turn it back on by tapping on the faded check mark.
How to create a feature on the map.
A feature can be a point, a line, an enclosed area (polygon), or a photo taken with your device and displayed on the map.
A feature also captures the coordinates.
How to mark your current location with a lat/long way point
1. Open CarryMap App and the map you downloaded.
2. Tap on your location marker until a push pin is displayed and at window open across the bottom of the screen.
3. Click on the three vertical dots on the right and the choose action screen opens
4. Tap on Create object here then tap on the Create new in the next pop up screen
5. Tap on Point in the Select geometry type screen
6. At this point you can follow on from step 5 on creating a point of interest
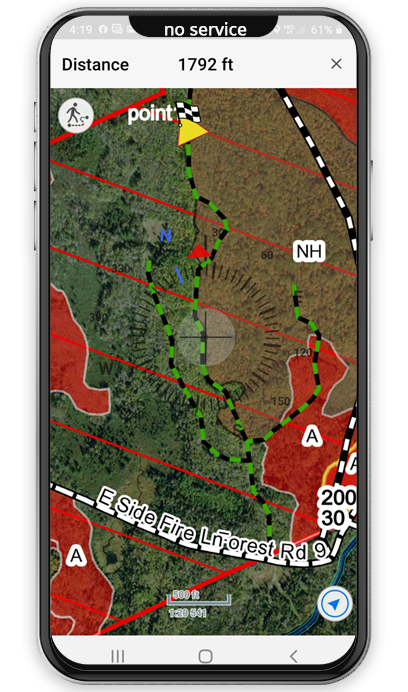
How to measure length (distance) and calculate the size of a given area
1. Open CarryMap App and the map you downloaded.
2. Tap on the ruler button at the top right of the screen.
3. Tap on the box with the line and square on the upper left of your screen
4. The top of the screen will either read Length or Area. Tap the box to switch between Length and Area
5. When the top of the screen reads Length, tap on the screen to create your starting point then tap on the screen create your ending point. The distance of the displayed line will appear at the top on the screen. The distance will show feet until distance exceeds a mile, the it will display in miles.
6. To measure an area, tap the box so Area displays. You need to create at least three points.
7. The Area being measured will shade-in.
8. To start over, tap on the X at the end of the box at the top of the screen
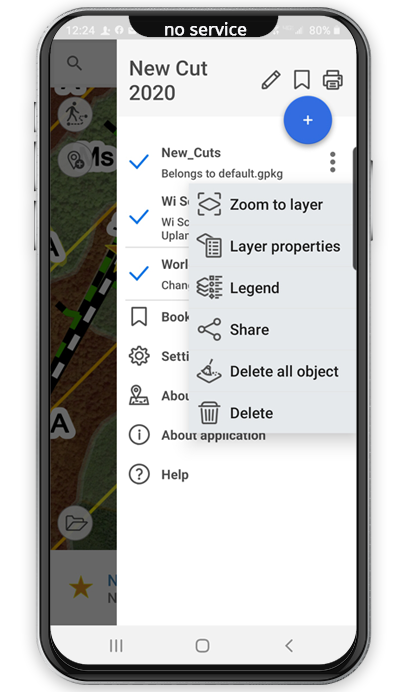
How to read the map legends and turn data layers on and off
1. Open CarryMap App and the map you downloaded.
2. Tap on the on the menu
3. Tap on the map name, not the check box, not the drop down arrow.
4. The screen that opens displays the primary map layers and buttons to turn the layers on and off by taping on them.
5. To the right of some of the buttons is an arrow. For example, tap on the arrow to the right of the Upland Layers button.
6. The new window displays a button for the state and county lands and a button for the federal lands, etc.
7. To left of the layer name is a down arrow. Tap on the down arrow and the color coded legend displays.
8. To return to a previous screen, tap on the Back arrow of at the top of the screen
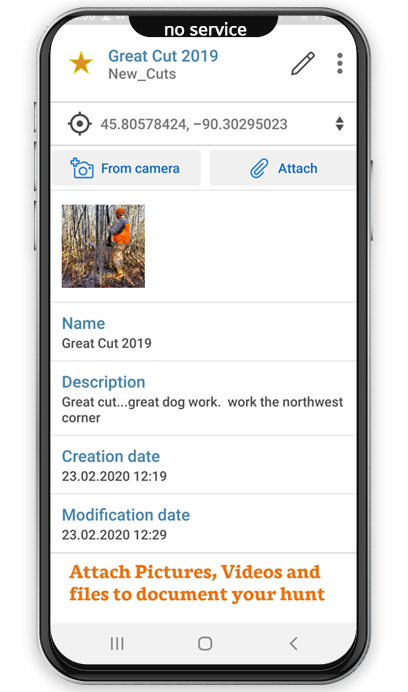
How to identify an item displayed on the map
1. Open CarryMap App and the map you downloaded.
2. Tap on the item of interest and a pop-up will appear at the bottom of the screen and a push pin will appear on the map where tapped.
3. The pop up confirms the color of the location, the proper name, and details. The dots beneath the details indicate additional screens can be accessed by swiping the dots.
4. In the center of the details box is a light gray line. Lightly tap on the line and the box will expand up showing the Lat/Long, Acres, primary and secondary habitat, and harvest year.
5. Tap on the grey line again to drop the box back down.
6. Tap on the three vertical dots on the right side of the box to open the Choose action pop-up. The first three actions are self explanatory. Tapping on the Show all objects displays a legend. Each color coded square box identifies the corresponding color on the map. To return to the map, tap on the box
How to record a Track and save it for future reference
1. Open CarryMap App and the map you downloaded.
2. Tap the walking person icon in the upper left.
3. In the Select layer to record track pop-up window, tap Create new.
4. You can keep the default layer name incorporates the current date, or you can create your own name. A layer name cannot start with numbers and can only contain alpha/numeric characters. Use an underscore to create spaces in the name. Click OK .
5. The map screen opens and the walking man icon is red. Tap on the red walking man to start recording your movement.
6. If you are not moving when you tap on the red, a pop-up will read Not enough points to save geometry. Start walking and tap Continue.
7. You can continue to move, stop, move, etc. until you want to save your track. Tap on the red walking man icon to stop and save the track.
8. To view the saved track, tap on the menu bars then tap on the layer containing the track. You can turn the displayed track off by taping on the menu bars and taping on the blue check mark next to the layer.
9. You can remove the layer from the menu by taping on the three vertical dots next to it and taping on remove.In many of the above steps you have created Layers and on those Layers you have created points of interest and recorded your tracks. Even though you may have removed the Layer from the menu, they have been stored in data. From you map window, tap on the menu bars then tap on the + Add. At the bottom on the window you will see Data, Maps, and Gallery. Tap on Data and all the Layers will display from top down in chronological order. By tapping on the Layer name it will display in the menu. To delete the layer, tap on the +Add, then tap on the three vertical dots next to the Layer’s name, tap on delete.
Read & Print iOS device user’s guide: 65 pages
Download Android Device Manual
Read & Print Android device user’s guide: 70 pages
Ability to tell another hunter where to meet you in the woods or parking lot by sharing waypoints or tracks
Attach pictures, videos, or files to your hunting waypoints
Use a waypoint as a destination